


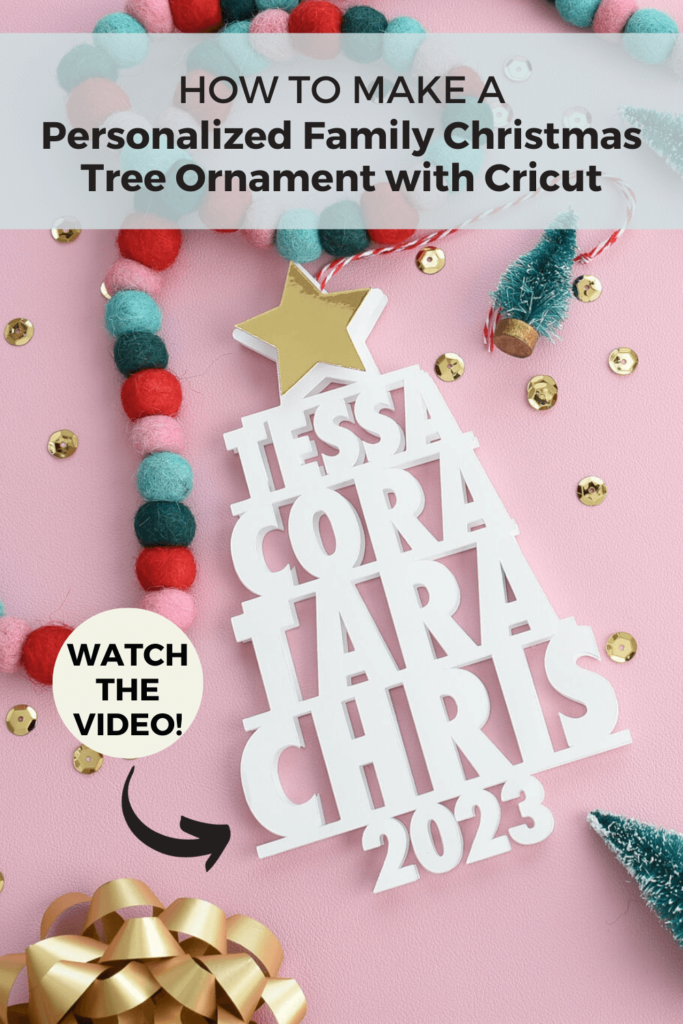
Step-by-Step Guide to Making Your Own Personalized Family Christmas Tree Ornament with Cricut
Create a one-of-a-kind keepsake with this Personalized Family Christmas Tree Ornament, an easy DIY project perfect for family, friends, and neighbors. These customized ornaments are a thoughtful way to showcase each family member or even a beloved pet. This unique handmade Christmas ornament features the year as the trunk and a star at the top, resembling the shape of a Christmas tree.
Surprisingly, I crafted these Family Christmas Tree Ornaments with Cricut using lightweight cardstock. Each ornament requires just two sheets of cardstock, and I specifically chose a smooth-textured type for more precise cuts on these moderately intricate designs.
Throughout this tutorial, I’ll show you simple ideas to strengthen and reinforce lightweight cardstock to improve the durability and ensure your ornament will last for years to come. Also, I will walk you through the tools needed within Cricut Design Space to transform text and achieve the tree shape for this Family Christmas Tree Ornament.
This post may contain affiliate links, which means I’ll receive a commission if you purchase through my links, at no extra cost to you. Please read my full disclosure for more information.
GRAB MY FREE beginner's guide to cricut cake toppers

Here's What You'll Need To Make the Family Christmas Tree Ornament with Cricut

Prepare your Family Christmas Tree Ornament in Cricut Design Space
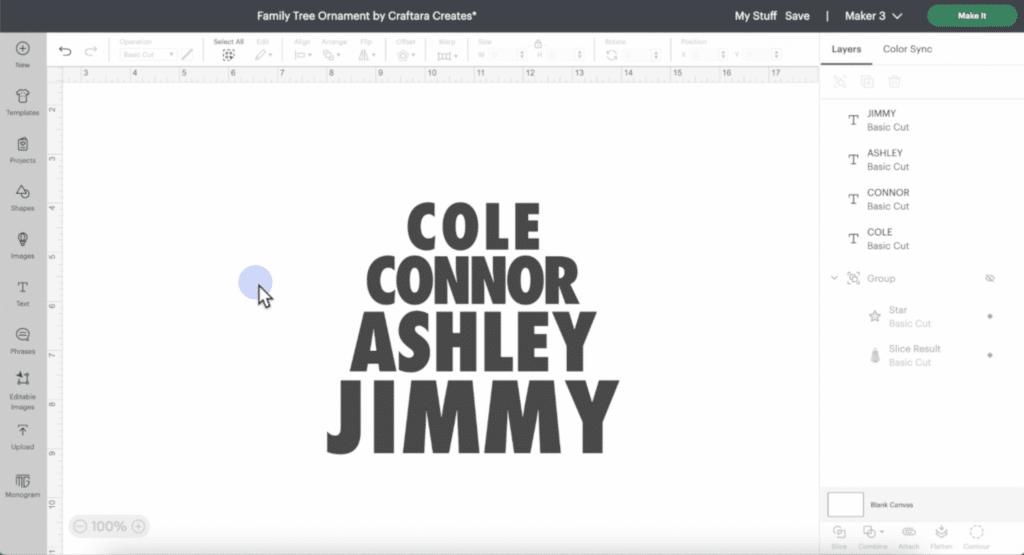
Open Cricut Design Space and start a new canvas.
Click on the text tool and type the name of the first person. You’ll want to use all caps and use a font that is uniform. This will make building out the multiple tiers of the ornament easier and look cleaner. I used the Cricut font Futura LT Condensed Extra Bold for my project.
Once the first name is done, duplicate it to create the second name in the family tree. Change the name to the next person and repeat that process for all the names you want to add.
Transform names into a tree shape using Cricut Design Space
There are a variety of tools inside cricut design space that will help transform names to create a shape.
First, adjust the size of each name to make them increasingly larger as the size of the tree widens. To do this, make sure the ratio lock is closed and click the up or down arrow on the width or height to adjust the size. The ratio lock closed means that the design will adjust both the height and widge at the same time when you adjust either one of those variables.
Once you have made adjustments to the text, check the shape of the tree by selecting all of the names, then Align, Center Horizontally.
Next, try adjusting the letter spacing. Use the update and down arrow of the letter space to change the amount of space in between the letters. For mine, I need to condense the second name to make it smaller. For some of the other names, I’ll use the letter space tool in the opposite direction to make the space between the letters larger.
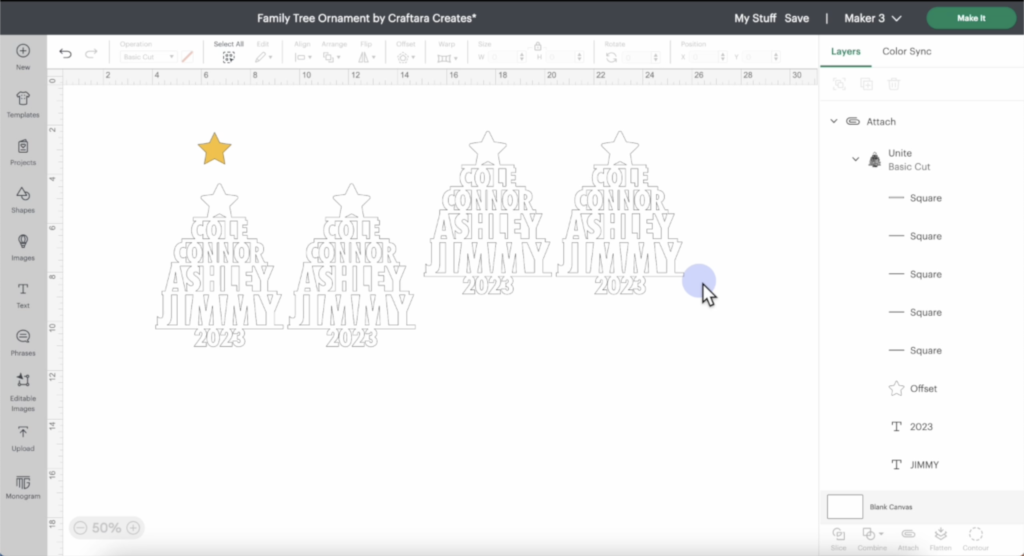
Once you are happy with the names, sizes and placement, next we need to add the year as the trunk of the tree. To do this, I duplicated one of the names and typed in the year. Move the year to the bottom and make any size adjustments you need.
Next, add a star to the top of the tree. Select a star from the shapes tool in Cricut Design space. Place the star at the top of the tree and size it to coordinate well with the rest of the project.
Use the offset tool to add another layer to this star. With the star highlighted, click offset and adjust the slider to create an offset that you like. I went with a thin offset.
Next we will make a narrow bar to put under each name which will connect each of the names on the family tree. Select a square shape from the free shapes section. With the square selected, click on the size ratio lock to unlock it. Adjust the size of the square to create a long, narrow rectangle shape.
Move the thin bar under one of the names. A trick to adjust the bar without changing the height is to check that the ratio lock is unlocked and adjust the width only. This way the height stays the same and the thin bar is sized perfectly for each name in the Family Christmas Tree Ornament.
Repeat the process by duplicating the bar and to place under each name, then adjust the length to fit the name. The goal is to ensure each letter is connected.

Every time you change the design be sure to use the align tool again to center the design.
Before uniting together the design, change the color to white which helps to see the outlines of the text and shapes better. Do a final check to make sure the text and bars touch for each level.
Make any last adjustments to align text and bars to ensure they overlap just enough to weld together into one.
How to Unite and Undo Unite in Cricut Design Space
Once you are satisfied, select the whole design again and unselect the star. Then click Combine, Unite.
After the Unite function is applied, the design is all one layer and at the top of the layers panel. It looks like we lost the star but it’s under the design. Find the star on the layers panel and use the arrange tool to bring the star to the front.
Take a look at the united design and see if any adjustments need to be made.
To undo the unite, click the combine tool again and select Undo Unite. Now, you can make adjustments before redoing the Unite to combine all the shapes together.
When you are happy with the design, repeat the process of selecting all and uniting the design.
At this point our design of the Family Christmas Tree Ornament with Cricut is almost ready to be cut but there’s one more essential step. To ensure the durability of this Cricut-made Family Christmas Tree Ornament, we need to reinforce the cardstock. The simplest method is to increase the cardstock’s thickness, and you don’t necessarily need to purchase thicker cardstock.
To achieve this, create additional layers that we can later combine with glue to increase the cardstock’s thickness. Replicate the united layer until you have a total of four layers for your Family Christmas Tree Ornament. You can also attach the layers together to maintain their alignment on the cutting mat.
When you are ready, send your project to the Cricut machine. Cut out all the layers in the cardstock of your choice.
Assemble the Family Christmas Tree Ornament with Cricut
After cutting out all the pieces, the first step is to combine the layers together. Use your preferred paper crafting glue and apply it across one of the layers. Cover the entire layer lightly with glue and then overlay another layer on top to create a single, thick layer.
Repeat this process for the remaining two layers. Consequently, you will have two fused together layers or thick layers.
Before proceeding, attach a string or ribbon for hanging the Family Christmas Tree Ornament. Secure the string or ribbon with hot glue on one of the layers. This layer will serve as the inside or bottom, and the glue will be covered by the top layer of the ornament, leaving the string in between the ornament’s layers.
Between the two thick layers, apply trimmed sections of extra-tall, double-sided adhesive foam tape. Use scissors or a craft knife to tailor the foam sections to the desired size. The more foam you incorporate into the ornament, the sturdier it will be.
Towards the bottom of the Family Christmas Tree Ornament, attach foam to the year. You may need to cut small sections of foam to size using a craft knife.
Once all the foam is in place, peel off the backing sheet from the foam. To help with the alignment of the top layer, apply a small dab of glue to each section of foam tape. This allows for a bit of maneuvering time to ensure perfect alignment between the layers.
Lastly, attach the star to the top of the Family Christmas Tree Ornament made with Cricut. You can attach the star using either glue or foam.

And with that, your Family Christmas Tree Ornament with Cricut is complete. In this tutorial, we practiced with tools in Cricut Design space to transform and shape text. Next, we applied simple techniques to strengthen cardstock to create a sturdy paper ornament.
I’m excited to make more ornaments. These make the perfect finishing touch for holiday gifts.
Did you enjoy this project?
Did you find this information on how to make a Family Christmas Tree Ornament with Cricut helpful? If so, please pin this idea and let me know your thoughts in the comments below.
22 Comments
Could you make it different color than white?
Sure! I’ve seen others use green.
How big are the names?
The names were between 1 and 1.5 inches tall.
Love this project. I am trying it as soon as I write this message. Thank you, Tara, for presenting a project that is fairly simple but looks so good with only a few materials needed.
So glad you love this project!
That is so cool. I will definitely be making some for the holidays.
Thank you for always sharing your creativity.
Rhonda
You’re very welcome!
This was easy to make, although I did a test run and didn’t include the foam tape. It looks great glued flat as well. Thanks for a great lesson!
Thanks awesome Karen!
What would you suggest if the family has only three names to make the tree effect
I think you could add as manage names as you’d like. It might get challenging with over 5 names but worth a try.
I have looked for this for the past two days and finally posted on a couple of the crafting FB pages that I was looking for the link. Sarah sent me this link and then I saw Amy post it! I am so excited about this ornament. My Cricut is cutting as I am typing this comment. Thanks so much!
How exciting! I’m so glad you found this project!
Thanks for this design! I think my family will be, hopefully, pleasantly surprised, as this is a unique way of doing this.
I hope they love this ornament!
So cute and so easy!! Thank you for sharing!
You’re Welcome!
I love this project! Can’t wait to try it! Thank you for the tutorial 😊
So glad you love this!
Love this and plan on making several for the Holiday.
Thank you Tara!
Yay! Glad to hear you love this project.