


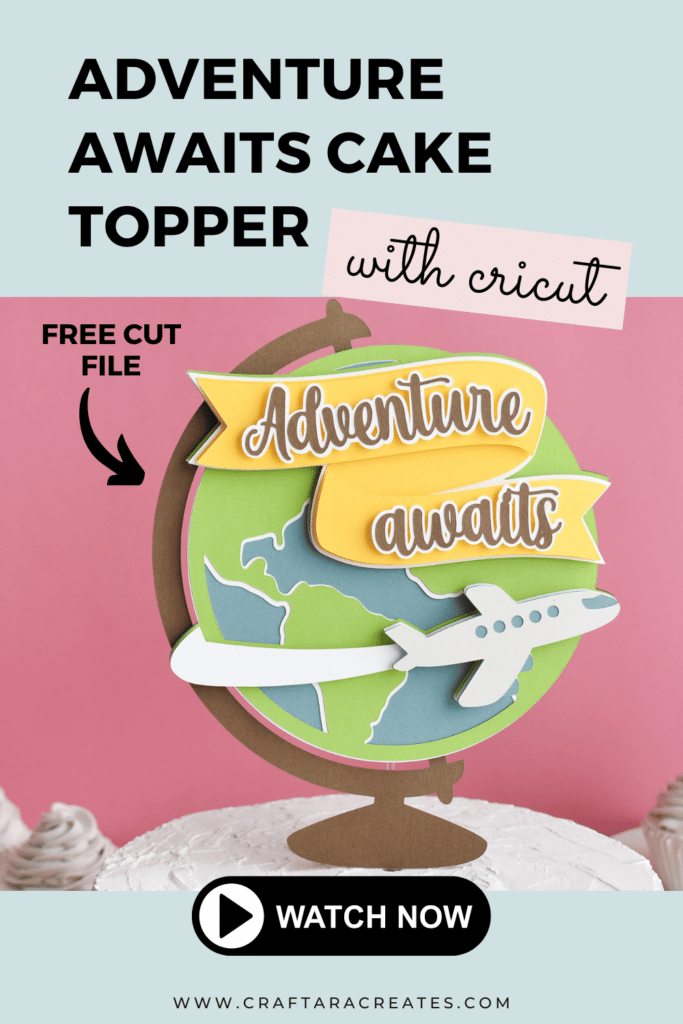
Learn how to make an Adventure Awaits Cake topper with Cricut
Do you know someone embarking on their next exciting journey? Whether it’s celebrating a graduation, an adventure-themed baby shower, or the launch of a new career, this Adventure Awaits cake topper will add that perfect special touch to their milestone event.
Designed with beginners in mind, this cake topper project is ideal for those new to Cricut crafting. Crafting it is easy with your cutting machine, and assembling the Adventure Awaits Cake topper is a piece of cake (pun intended). Watch the step-by-step video tutorial below for easy guidance, and you’ll soon have a fun cake topper that will be the centerpiece of the party.
Grab the free cut file below and follow along as I guide you step-by-step through the process of creating a cake topper that will be the start of your next adventure.
This post may contain affiliate links, which means I’ll receive a commission if you purchase through my links, at no extra cost to you. Please read my full disclosure for more information.
Where can I find the Adventure Awaits Cake topper cut file?
Grab the free Adventure Awaits cake topper svg cut file from my resource library in the Celebration craft freebie section and upload the SVG cut file into Cricut Design Space. Sign up below to unlock the resource library.
You will be included in my email newsletter with helpful Cricut ideas, tips and resources. Unsubscribe anytime and your email will never be shared.
Adventure themed party ideas
This Adventure Awaits design is versatile and fits beautifully into a range of life events and gatherings. Whether you’re celebrating a graduation, hosting an adventure-themed baby shower, bidding someone farewell, or toasting to a new job, this cake topper adds that special touch to make your event memorable.

Here's what you'll need to make the Adventure Awaits cake topper
- Cake topper cut file
- Cricut Machine
- Blue Light Grip Machine Mat
- Fine Point Blade (which comes with all Cricut machines)
- Cardstock
- Double Sided Adhesive Foam Strips And Tabs
- Paper Crafting Glue
- Acrylic Cake Pop Stick
- Brayer
- Hot Glue Gun
How to make the Adventure Awaits Cake Topper
- Start this project by opening a blank canvas in Cricut Design Space.
- Click on “Upload” and upload the included ‘SVG-AdventureGlobeCakeTopper’ file
- Double check the size of the cake topper design
- Click on “make it” to prepare the design for cutting.
- Select your desired material and adjust the cut settings as needed.
- Place your cardstock on a blue light grip mat.
- Use a brayer to roll over the cardstock, ensuring that it is well secured to the mat.
- Load the mat into the Cricut machine and press the blinking load button.
- Follow the on-screen prompts in Cricut Design Space to guide the cutting process.
- Press the blinking button to start the cut.
- When the cutting is finished, use a Cricut spatula to help unload the mat and keep the cardstock flat.
- Use a scraper tool to remove any remaining pieces from the mat.
- Repeat steps 6-12 for the additional colors or cuts needed for the project.
- Gather all the pieces of your cake topper: the base globe layer, text, banner, and airplane.
- Start by assembling the world by gluing the white layer on top of the blue layer.
- Then glue the green layer on top of the white layer.
- Add the assembled layers to the brown globe base layer with adhesive foam.
- Assemble the airplane by gluing the gray layer to the blue layer.
- Add adhesive foam to the airplane and add to the white wind gust strip.
- Place the airplane and wind gust on the cake topper with adhesive foam to make it look more three-dimensional.
- Assemble ‘Adventure awaits’ by gluing the text to the white offset layer.
- Assemble the banner by gluing the large yellow layer to the white layer.
- Apply adhesive foam to the back of the bottom and top pieces of the banner to create dimension.
- Add the text ‘Adventure awaits’ to the banner using adhesive foam.
- Add the assembled banner to the cake topper with adhesive foam, using the shapes on the edges to guide placement.
- Use a hot glue gun to add a clear acrylic cake pop stick to the back of the cake topper.
Was This Tutorial Helpful?
Did you find this information on how to make an Adventure Awaits cake topper with Cricut helpful? If so, please pin this idea and let me know your thoughts in the comments below.