


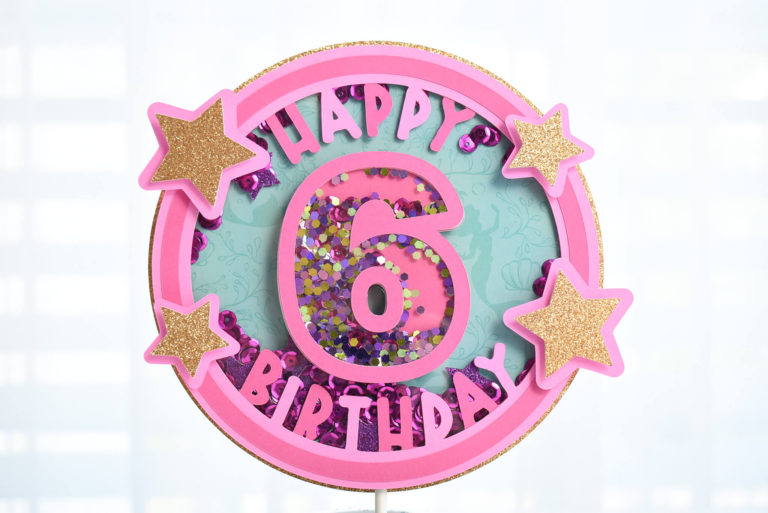
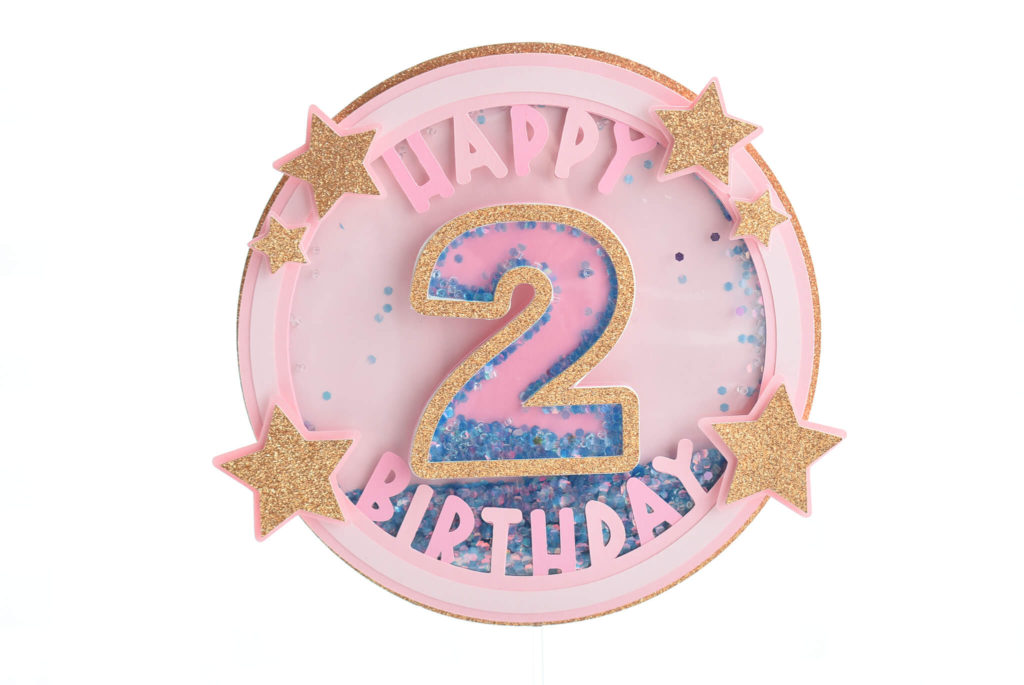
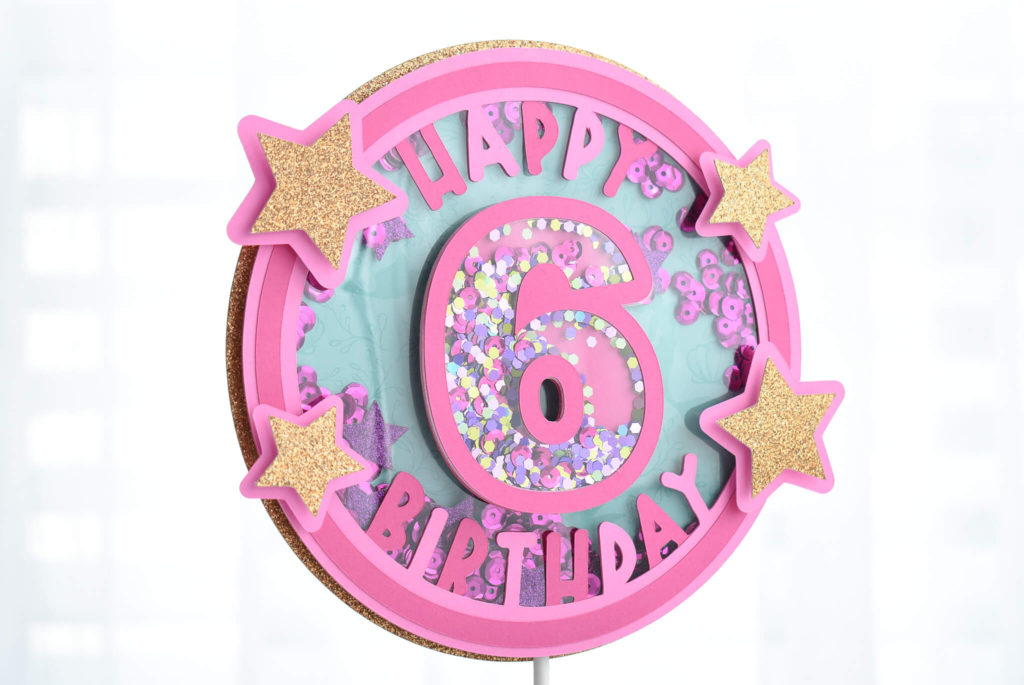
My daughters love when I make shaker cake toppers with my Cricut. And they get even more excited when I customize the shaker cake topper for them. Using the Cricut Design Space offset tool, I love making custom shaker cake toppers out of almost any letter, number or design.
My daughters run around the house intensely flapping the shaker cake toppers which fills with me anxiety about all that glitter spilling out. Luckily, I worked out a great strategy with the materials I use to make shaker cake toppers to keep all that glitter where it is supposed to be.
This post may contain affiliate links, which means I’ll receive a commission if you purchase through my links, at no extra cost to you. Please read my full disclosure for more information.
Grab free shaker cake topper cut file here
To help make this double shaker cake topper easier to make with Cricut, I created a cut file for the base circle shape.
The shaker cake topper base SVG cut file is free in my resource library. Sign up here to unlock the resource library and grab the free SVG cut file. You will find this in the celebration section of the resource library.
You will be included in my email newsletter with helpful Cricut ideas, tips and resources. Unsubscribe anytime and your email will never be shared.
Here's what you'll need to make a shaker cake topper with Cricut
How to make a shaker cake topper with Cricut
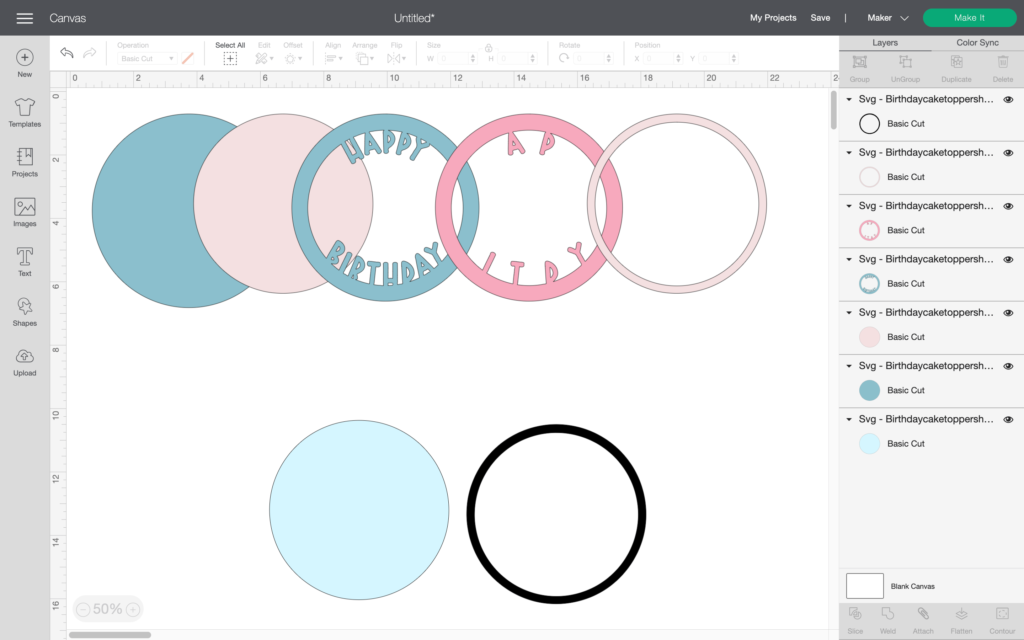
To get started making the double shaker cake topper with Cricut, upload the free SVG cut file into Cricut Design Space. Ungroup the layers so you can work with all the layers independently. The overall size of the shaker is about six inches.
The light blue color indicates a part of the design to be cut with clear acetate for the window of the cake topper shaker. The black part of the design indicates a cut with adhesive foam sheets.
To review the structure of the rest of the design:
- The top layer is a thin ring.
- Next are the two layers with the saying ‘happy birthday’. The letters are already connected to the outside rings.
- Then a circle to serve as the backing of the shaker and a final circle that is an offset of the previous circle.
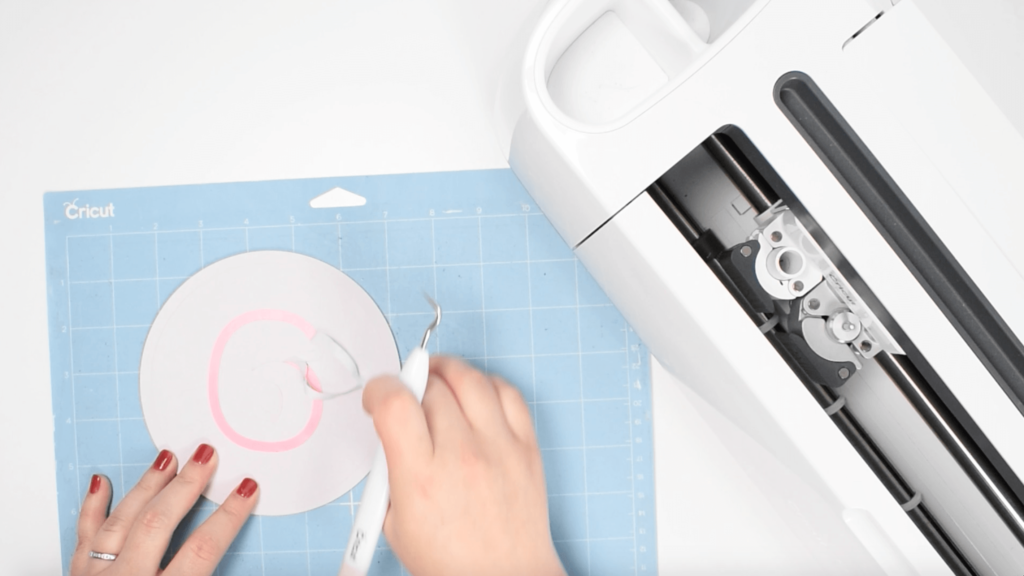
To make a custom shaker for the center of the cake topper with the age of the birthday girl or boy, use the text tool to add a number. I used Arial Black because the font is bold and allows enough space for the custom shaker.
My favorite way to make the outer edge for custom shaker cake toppers is using the offset tool in Cricut Design Space (which is currently only available on the desktop version of Cricut Design Space). To do that, Select the number and select offset. Make the offset .2 for the distance, then click apply.
With the number and offset layer selected, click Slice on the bottom right side of Cricut Design Space. The result is three separate designs are created. The outline of the number is what we need for the custom shaker and this will be cut out of craft foam to allow space to add glitter.
The anatomy of a cake topper shaker is a solid back layer, then an outline of the shape in a material to add space like adhesive foam, next is a clear acetate window and finally, another layer over top to cover imperfections and for a finished look.
Cut all materials for the cake topper shaker
Once you click Make It to send the design to the Cricut machine, located the black mat that indicates the adhesive foam cuts and be sure to mirror the design. The reason behind mirroring the foam cut is because I apply the acetate shaker window to the back side or the adhesive side of the foam.
For adhesive foam cuts, switch the Cricut blade out for the deep point blade and move the star wheels out of the way until the cut is complete. Select craft foam for the material and more pressure.
Next, cut the acetate sheet for the window of the shaker. The acetate sheets I have worked with come with a film overtop. Remove the film because Cricut cuts better without the film. To prepare Cricut, switch out the deep point blade for the fine point blade and move the star wheels back in place. The material setting in Cricut Design Space is Acetate and I select more pressure.
Assemble the cake topper shaker
Adhesive foam can be challenging to work with because it moves a lot and sticks to everything once the backing is removed. My trick for easily applying acetate to adhesive foam is to place the foam adhesive side up on a Cricut mat. Pull off the backing. Then, line up the acetate and press it into the foam for a perfect seal.
Next, grab some chunky glitter, sequins or confetti. Add the glitter to the cake topper shaker. Use a glue with a precision tip to apply a line of glue around the adhesive foam. Apply the backing to the shaker to seal in the glitter.
While the glue is drying, add something flat and heavy over top to dry flat. A book would work as well. Sit the cake topper shakers off to the side to dry and assemble the rest of the project.
If you created any designs for the sides, put those together now. I used adhesive foam in between the layers of the stars.
Next, we will create the Happy Birthday layers. These layers are designed to be glued together.
Add glue around the back side of the top layer and the letters. Align the layer on top of the other layer to complete the happy birthday. While the glue is wet, you can adjust the layers if needed. Add glue to the thin outside ring and apply that to the top.
Now we are ready to put the cake topper all together. Yay!
Grab the cardstock top layer for the custom number shaker and apply glue to the back and secure to the top of the shaker. This top layer provides a finished look.
Next, add the happy birthday layer to the top of the base circle shaker. The cardstock layer is wider than the shaker so I applied glue to the shaker directly, then placed the happy birthday layers on top.
The number shaker will go in the middle. I used adhesive foam to secure the two shakers together.
At this point, add any designs to the sides of the cake topper using adhesive craft foam.
Now the cake topper shaker is ready for the stick. I chose a white cake pop stick and used hot glue to attach the stick.
The cake topper is ready for the final step to combine the project all together. Add adhesive foam to connect the cake topper to the base. This nicely tucks the stick inside the final project.
I love how sparkly this cake topper shaker is and allows space to customize the number shaker to celebrate any age. I hope you enjoyed making this double shaker cake topper with Cricut.
Was this tutorial helpful?
Did you find this tutorial on how to make a shaker cake topper with Cricut helpful? If so, please pin this idea and let me know your thoughts in the comments below. I’d love to hear from you!
3 Comments
Hi thank you so much for sharing the svgs. You are so awesome. I fell in love with the cake shaker topper.
I’m so glad you enjoyed this project!
Really interesting post!